Trampoline Patching: Best Way to Repair Your Trampoline
Simple and Easy Trampoline Patching Techniques: A trampoline is made of galvanized steel frame, jumping mat, enclosure net, poles, springs, and other parts. Some parts may get damaged due to heavy use, UV rays, and other weather effects.
It would help if you patched the trampoline to make it safe and usable again and increase its lifespan. Repairing a trampoline is an easy task to do. We will provide a complete guideline for you.
The trampolines are designed to last for 5 to 10 years. The lifespan of a trampoline depends upon its use, maintenance, and the surrounding climate. When the mat or netting shows wear and tear, you should know that it is time to repair it. Make sure you have a trampoline repair kit to patch it.
What Is a Trampoline Repair Kit?
A trampoline repair kit is a pack of various tools to repair holes and tears in a jumping mat or net. The kit includes glue, patches, glue applier, hand gloves, and other necessary things.
A sewing kit will consist of UV-resistant thread and industrial-grade needles if it is a sewing kit. It may also include a spring puller tool so that you can easily replace the rusty and broken springs.
A kit designed to repair the mat is known as a trampoline mat repair kit. Some manufacturers provide the trampoline patch kit together with every new trampoline.
Click Here to Get Best Trampoline Repair Kit
How a Trampoline Repair Kit Works
A trampoline repair kit is made for repairing the holes and tears in its mat or net. It comes with some cloth (patches), thread & needle or glue & applier tool, and a spring puller.
It would help if you used these tools for patching your trampoline mat, enclosure net, and springs. The kit allows you to repair the tears and holes to make it safe to use again and increase its lifespan.
When you have a new trampoline, it does not have any problem. However, various parts and edges start showing wear and tear as it becomes older. Suppose your jumping mat or enclosure net has a tiny hole of 2/10-inch or smaller than it does not need to be patched.
Here, we will discuss normal wear and tear, the damage that happens to the trampoline, and a step-by-step guideline to fix or repair that damage without the help of a professional.
When Is a Trampoline Mat Can’t be Repaired?
A trampoline mat becomes unsalvageable (non-repairable) when it has a hole bigger than 2-3 inches. You may think that you can patch the jumping mat, but such a big hole will cause the carpet to tears again when the kids are jumping on it. Also, if that hole is near the center of the mat, then it has more chances to get damaged again.
When your trampoline mat has multiple holes, i.e., more than five holes or tears near edges and at different places, it cannot be repaired. Even if you try to fix it with a trampoline repair kit, it will not last too long and will be dangerous for your kids to jump on it. It would help if you replaced your mat with a brand new carpet in such circumstances.
Check Toddler trampoline with the handlebar
How to Patch Holes and Tears in a Trampoline Mat
The jumping mat is made of premium quality permeation or polypropylene material. It may show wear and tear after several months or more than a year. When your trampoline mat has one or more holes and tears, it is time to repair it.
To repair holes or tears, you can use a trampoline repair kit with adhesive glue or a needle & thread. It is ultimately your choice to patch your trampoline by sewing it or applying the adhesive.
#1. Repair a Trampoline Mat with an Adhesive
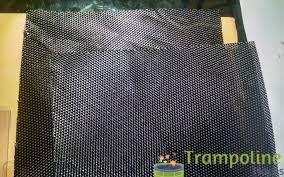
When the mat has tiny holes or tears, you can quickly fix it with the help of a repair kit. Ensure the kit includes adhesive glue; otherwise, you need to purchase it from Amazon at a reasonable price. You will also need a patch, i.e., a piece of cloth made of outdoor vinyl fabric, canvas, or any other high-quality material.
The repair kit includes two to three patches. If you need more patches, you need to purchase or arrange them yourself. If you have old trampoline mats and their condition is still good, you can use them to pat your trampoline. Most trampoline mats are built from the best high-quality polypropylene, which lasts for years.
Check best trampolines under 100$
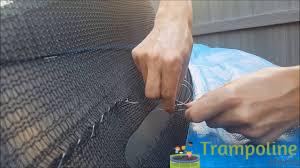
You should wear hand gloves to save your hands and skin from the glue. After that, you need to apply the glue on the patch’s edges (fabric) and attach it over the hole from underneath the mat. Connecting the fabric cloth on top of the rug may create a little bump there.
After all the holes in the carpet are patched, you should leave your trampoline alone for 24 hours so that the glue can dry out. Then, your kids can start jumping on it from the next day of repair.
#2. Repair a Trampoline Mat with a Sewing Kit
This repairing method is complicated for those who don’t know how to sew a cloth. But it also has some benefits like sewing the mat, and you will not need to wait for drying out.
You will need an industrial-grade canvas-approved needle and high-quality thread to sew the holes and tears in your trampoline mat. If you don’t have hands and line, purchase them from Amazon at the best price. You can sew the mat manually or by a sewing machine.
If you want to repair the jumping mat on a machine, you have to take off the mat from your trampoline. After removing the carpet, you should patch all the holes and tears by using a piece of cloth. Once the rug is patched correctly, you should attach the mat and spring cover again.
If you want to sew it manually, you will need one more person and 2 pliers for that process. It would help if you stayed on the top of the mat, and your friend should stay underneath.
Then, start sewing it underneath and take at least two-three rounds of stitches to make the patching stronger and more durable. After that, you can instantly allow your kids to start playing on it.
How to Repair a Trampoline Net
When the kids jump on the trampoline, they may hit the net. The safety enclosure net is made of UV-resistant polyethylene material, and it is designed to save the jumpers from falling off the trampoline.
But the net may have a hole or some tears. Don’t worry, and we will give you the two best and easiest ways to repair a trampoline net in a few minutes.
This method of repairing the enclosure net is the same as we mentioned above for the mat. The only difference is that you will need two patches to attach one on each side and make the sandwich over the tear or hole.
Check Best trampolines under 500$
#1. Sewing Method
You can sew the hole or tear with a pair of patches on a sewing machine. However, you have to take off the safety net to repair. After you have sewn all the damaged areas of the net, you should trim the excess material of each patch.
As the enclosure net is thin, the manual sewing method is not recommended for it. After repairing the net, attach it again to your trampoline.
#2. Duct Tape Method
You may not have much time to sew the net so this method can save your time. You don’t need a piece of cloth in the duct tape method. The duct tape does not provide a permanent solution, but it is the best and quickest way to repair a small hole or tear on the enclosure net.
We request you to apply the duct tape on both sides of the net and apply it in multi-layer to make it stronger and more durable.
You can also use duct tape to repair a tiny hole in your trampoline mat, but it is not recommended. Because the carpet will get stretched with every jump, the small hole may be affected by it. Therefore you should apply the patch by sewing or adhesive for your kids’ safety.
How to Fix Trampoline Springs
The trampoline repair kit also includes a spring puller tool that can attach and detach a spring. The springs may become rusty if the surrounding weather is too humid. You cannot repair the rusty or broken spring, and you have to replace it.
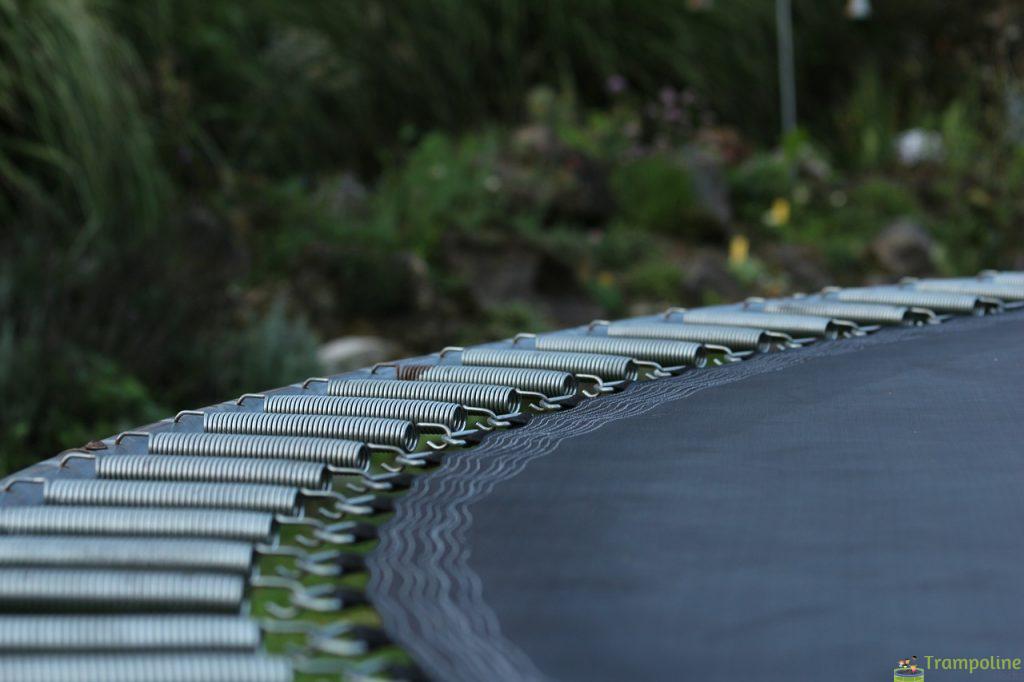
To replace the springs, you must have the brand new springs of the same size length. Different trampolines come with varying springs of size. If you don’t have the springs, purchase them from Amazon and begin the spring replacement process.
The spring puller tool is a mandatory tool to replace your trampoline springs. If you don’t have it, purchase it from Amazon. It is recommended to remove the jumping mat before replacing one or more springs.
Because the new springs are stiff and it is pretty dangerous to replace them when the carpet is attached. After the springs are replaced and the mat is attached back, you should check everything before allowing the kids to play and jump on it.
Frequently Asked Questions
When you are repairing a trampoline for the first time, you may have some doubts in your mind. Here we provide the frequently asked questions and answers to clear your doubts and answer your queries. In addition, we request you to refer all FAQs mentioned below:
How do you repair a tear in a trampoline?
You can repair a tear in a trampoline with the help of an adhesive or a sewing kit. However, if you want a durable repair for tear or hole, you should sew it with a patch.
What part of the trampoline that you jump on called?
The part of the trampoline that you jump on is called either bounce mat or jumping mat or jump mat or trampoline bed.
When should I replace my trampoline mat?
It would help if you replaced your trampoline mat with a new carpet when it has big tears or holes that cannot be repaired with a patch by sewing method or adhesive.
Final Words:
All the information we have shared about patching a trampoline is accurate and fair. We have explained some simple methods to repair a mat, net, and replace the springs. Now, you know that you can fix the jumping mat and enclosure net without the help of a professional.
If you have any queries or questions regarding any patching methods, you can ask us in the comment box.
Hi, It’s Jason and Louise here and welcome to our website. We are parents to Hannah and Zachary who absolutely love the outdoors and are actually addicted to jumping on their trampoline. Our amazing little family lives on a beautiful 20-hectare rural property with Horses, Dogs, Cats, Chooks, a Rooster, Cats and also a Pet Kangaroo.